Yoga Poses - Low Lunge Pose
We will share the benefits of low lunge pose,practice steps and common problems for beginners and precautions.
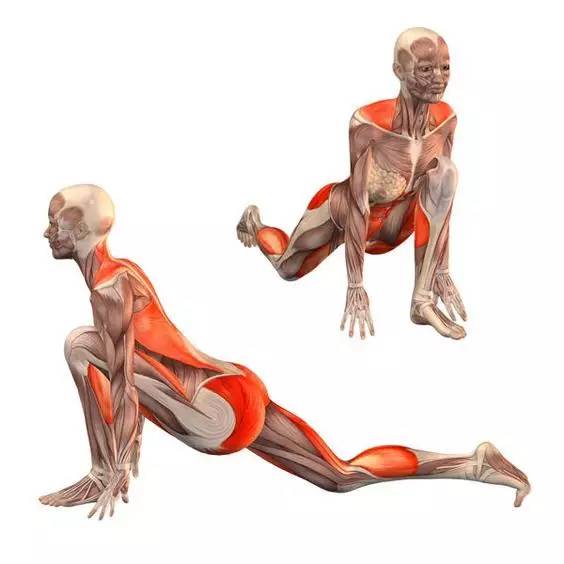
 In this pose, you have to keep your legs smooth,the hip is also corresponding to keep left and right parallel; back thigh stretch; back of the instep front to force under pressure; eyes to his fingertips to keep the spine straight state.

Practice this pose can help to strengthen the leg strength, while stretching the back of the leg and thigh front and groin position, improve the focus.
Flexion, left foot to move back a big step, knee back to the ground, right foot toes in front, in front of the vertical leg vertical, thigh lateral force continued to hip.
Common problems and solutions
 1. The situation of the waist, then you can put the hand on the bottom of the iliac position, four fingers forward, elbow to the adduction, the pubic bone to mention,
2. When the knee is under pressure, the bottom can be padded with blankets (as shown above).
Stage Two
On the base of the first stage, the rear leg straightening, the method is as follows, the back of the toes back to the hook, knee off the ground, big legs strong push back, start the thigh muscles at the same time the knee straight.
Common problems and solutions
 1. Can not find the power of the rear leg, you can choose yoga brick to help, the yoga brick vertical wall placed, rear feet, toes step on the heel push yoga brick (as the picture shown above), to find the rear leg force status;
2. For some beginners who is easy to make the body forward, you have to let the body back, the focus came to the top of the hip.
Stage Three
On the base of second stage,arms up your head,palm relative,and look forward
Common problems and solutions
 1. The distance between the arms is too wide or too narrow, then we can choose to stretch to bring auxiliary, stretch buckle into a ring, with the inside of the shoulder width, put it on the wrist, find the force of resistance (as shown above ), The lateral force of the arm to the inside, stretching to the little thumb tip, the inside of the force to mention, stretched to the thumb;
2. For some beginners who is easy to tightly shrug, you can keep your shoulders away from the ears, naturally relax down to sink.
2. If you have high blood pressure, do not lift your head, you can put on the chest prayer. The same time as the above-
3. When the bow, the ankle should be placed under the knee, you can kneel on the mat to protect the knees, careful not to over-stretching.
Anatomical position map
The benefits of Low Lunge Pose

Practice this pose can help to strengthen the leg strength, while stretching the back of the leg and thigh front and groin position, improve the focus.
Practice steps of Low Lunge Pose
Stage OneFlexion, left foot to move back a big step, knee back to the ground, right foot toes in front, in front of the vertical leg vertical, thigh lateral force continued to hip.
Common problems and solutions

2. When the knee is under pressure, the bottom can be padded with blankets (as shown above).
Stage Two
On the base of the first stage, the rear leg straightening, the method is as follows, the back of the toes back to the hook, knee off the ground, big legs strong push back, start the thigh muscles at the same time the knee straight.
Common problems and solutions

2. For some beginners who is easy to make the body forward, you have to let the body back, the focus came to the top of the hip.
Stage Three
On the base of second stage,arms up your head,palm relative,and look forward
Common problems and solutions

2. For some beginners who is easy to tightly shrug, you can keep your shoulders away from the ears, naturally relax down to sink.
Precautions
1. If you have cervical disease, do not bow when practicing.2. If you have high blood pressure, do not lift your head, you can put on the chest prayer. The same time as the above-
3. When the bow, the ankle should be placed under the knee, you can kneel on the mat to protect the knees, careful not to over-stretching.


Comments
Post a Comment